TiviMate is a widely used IPTV player known for its intuitive user interface and feature-rich functionality, making it a preferred choice for IPTV users.
More Info : Best IPTV
One of its most valuable features is the ability to record live TV shows, allowing users to capture their favorite content for later viewing.
However, not all IPTV providers support the recording feature. If your provider allows it, you can take full advantage of TiviMate’s recording capabilities.
This feature is particularly useful for recording live sports events, news broadcasts, or any show you may not be able to watch in real time.
This guide will walk you through the process of recording TV shows on TiviMate, including scheduling recordings and locating saved content.
How to Schedule a Weekly Recording on TiviMate
To schedule recordings, you must have TiviMate Premium installed on your Android TV box and properly configured with IPTV service details. Follow these steps to set up a custom weekly recording:
Step-by-Step Guide
1. Open the TV Guide – Navigate to the channel you want to record. You do not need to select a specific show, as long as you know the broadcast time.
2. Access the Recording Menu – Press and hold the Select/OK button on your remote to bring up a menu on the right side of the screen.
3. Select “Custom Recording” – Scroll down and choose “New Recording.”
4. Set the Recording Parameters:
- Choose the start date and start time.
- Set the duration of the recording.
5. Enable Weekly Recording:
- Click “Repeat” and select the day of the week the program airs.
6. Name the Recording – Assign a title for easy identification.
Pro Tip:
To account for potential IPTV delays, it is advisable to extend the recording duration by an extra 5–10 minutes. This ensures that minor scheduling inconsistencies do not result in missing the final moments of a program.
Recording IPTV in Manual Mode
If you wish to record content manually while watching a live stream, follow these steps:
1. Start Playing the Channel – Tune in to the channel you want to record.
2. Access the Recording Option – Press the UP button on your remote until the menu appears.
3. Select the Recording Icon – Highlight the recording symbol and press OK.

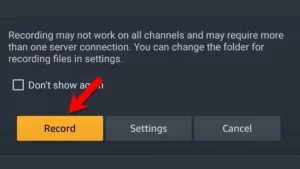
4. Confirm the Recording – Click “Record” to start capturing the content.

5. Recording Confirmation – A message will appear, confirming that recording is in progress.

Locating Recorded Shows on TiviMate
To access your recorded content:
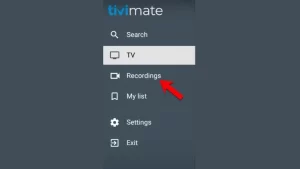
1. Open the Left-Side Menu – While on the channel listing, press the left arrow button on your remote.
2. Select “Recordings” – Navigate to the Recordings section to view and play your saved programs.

Frequently Asked Questions (FAQ)
Do I Need External Storage to Record IPTV?
The storage required for recording IPTV content varies depending on resolution and length. A 40–50 minute episode recorded in 1080p typically consumes between 2 to 4 GB of storage.
-
If you are using an Android device with ample internal storage (e.g., MeCool Box), external storage is not necessary.
-
If you are using a Firestick, external storage is required due to its limited internal capacity.
More Info : Best IPTV
Why Is TiviMate Not Recording?
If you experience issues with TiviMate’s recording feature:
-
Ensure your device has power and remains on. If the app is closed, recording will not work.
-
Avoid plugging your USB power cord into your TV’s USB port, as power may be cut off when the TV is turned off.
What Are the Benefits of TiviMate Premium?
TiviMate Premium enhances the IPTV experience by allowing users to:
-
Integrate third-party IPTV services using M3U links, Xtream Codes, and Stalker Portal.
-
Access advanced features such as recording, multiple playlists, EPG support, and user interface customization.


